Animesh Mastery: Creating Animated Mesh
Animesh Mastery: Creating Animated Mesh — Free class in Alife Virtual School
Welcome, Creators, to Alife Virtual School! In the ever-expanding metaverse, the ability to create dynamic, living content is what separates a static world from a vibrant, breathing reality. Today, we're diving deep into one of the most powerful tools in a creator's arsenal with Animesh Mastery: Creating Animated Mesh. This advanced workshop will guide you through the complete professional workflow, from a static model in Blender to a fully animated, interactive object inside Alife Virtual. Imagine creating wandering pets for your home, non-player characters (NPCs) that bring your roleplay sims to life, or complex animated machinery that powers your virtual creations. This skill is your key to unlocking the next level of immersion, and here in Alife Virtual, we empower you to do it without the financial barriers found elsewhere.
The Alife Advantage: Create Freely, Without Limits
In many virtual worlds, the dream of being a high-end creator is locked behind a paywall. Every texture, every mesh, and every animation costs real money to upload, and the land required to build on can cost hundreds of dollars a month. This stifles creativity and turns a passion into a costly expense. Alife Virtual was built on a different philosophy: a truly free 3D world where your imagination is the only currency.
Let's break down the staggering difference in cost between creating in Alife Virtual and a platform like Second Life. For a project of this scale, the difference isn't just a few dollars—it's a game-changer.
| Feature / Action | Alife Virtual (100% Free Economy) | Second Life (Legacy Virtual Economy) |
|---|---|---|
| Private Land (Full Region/Sim) | FREE - Every member gets a 65,536 sqm private island, for one month. | ~$300 USD per month for a private region, plus setup fees. |
| Mesh Model Upload | FREE - Unlimited uploads. | L$10+ per upload, plus a fee calculated based on mesh complexity. |
| Animation Upload | FREE - Unlimited uploads. | L$10 per upload. |
| Texture Upload | FREE - Unlimited uploads. | L$10 per upload. |
| Total Cost for this Tutorial Project | $0.00 | $300+ (for the first month on your own land) plus numerous upload fees. |
In this Second Life alternative, you are free to experiment, fail, iterate, and succeed without spending a single cent. This is the core of the Alife Virtual promise: empowering a new generation of metaverse creators.
What You Will Learn in This Class
Upon completing this masterclass, you will have the knowledge and practical skills to:
- Prepare a 3D mesh model in Blender for animation and in-world performance.
- Rig a custom mesh to the standard Second Life / OpenSimulator skeleton.
- Perform basic weight painting to ensure smooth, believable deformations.
- Create and export a simple animation loop from Blender.
- Upload your rigged mesh and animations to Alife Virtual correctly.
- Use a basic LSL scripting command to trigger your animations on an object in-world.
- Understand the key concepts of Land Impact and optimization for Animesh.
Prerequisites for Success
This is an Advanced class. We assume you are already comfortable with the following:
- Software: You must have Blender (a free 3D modeling suite), the Avastar plugin for Blender (highly recommended, though manual rigging is possible), and the Firestorm Viewer installed.
- Blender Skills: Basic navigation, object creation, editing modes (Object/Edit), and an understanding of mesh topology (vertices, edges, faces).
- Alife Virtual Skills: Basic building (rezzing prims), inventory management, and editing object properties.
- Conceptual Understanding: You should know what a "rig" is and have a general idea of what "weight painting" accomplishes.
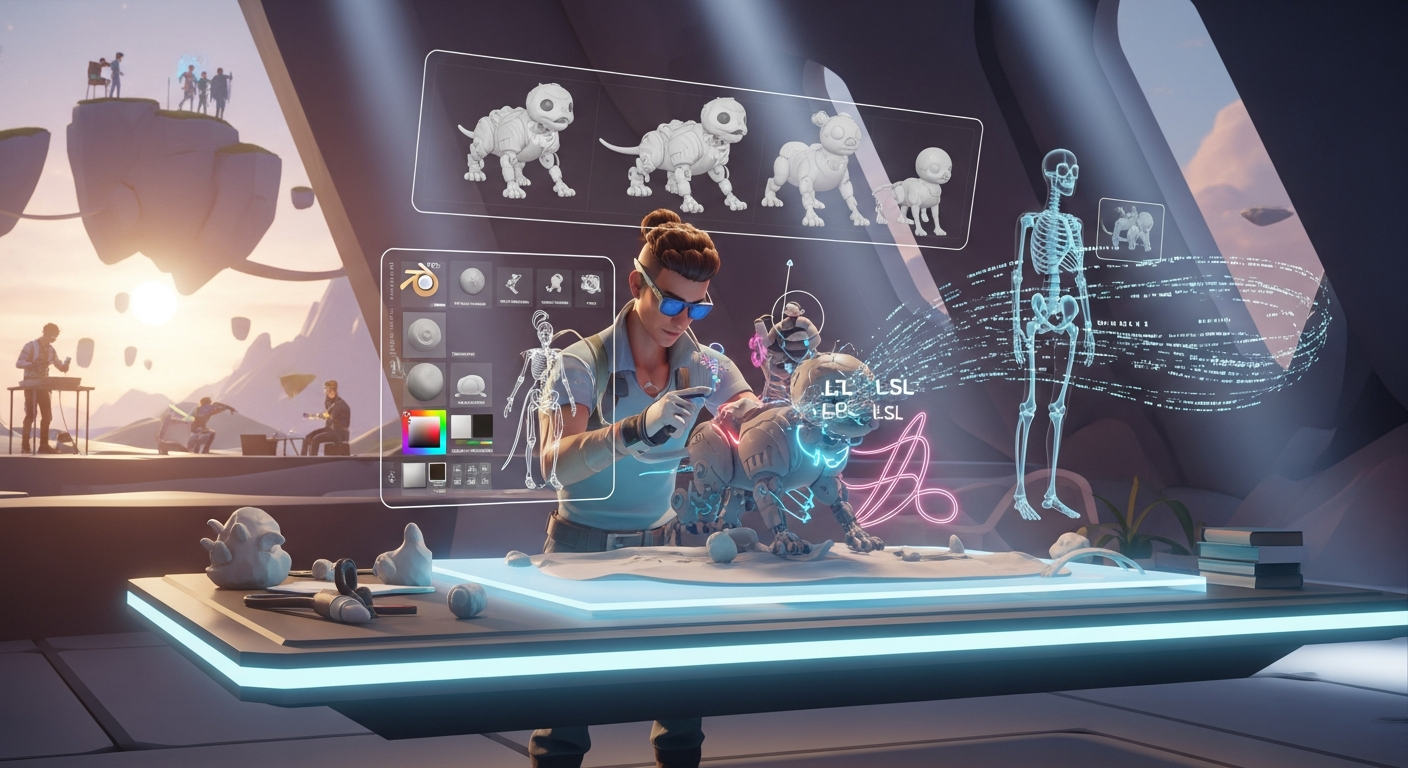
The Animesh Masterclass: Step-by-Step Workflow
Follow these phases meticulously. Every step is crucial for a successful outcome. For this tutorial, we will create a simple, floating "helper bot" as our Animesh object.
Phase 1: Model Preparation in Blender
Before you even think about bones and animations, your model must be clean, efficient, and ready for the grid.
- Create Your Model: Start with a new Blender scene. Create your helper bot. A simple sphere for the body, a smaller sphere for an "eye," and perhaps some simple antenna shapes will suffice. Keep the polygon count reasonable. A good target for a small pet/NPC is under 10,000 triangles.
- Join Your Meshes: Once you are happy with the shape, select all the individual parts of your bot and join them into a single object using Ctrl + J. This is crucial for rigging.
- Check and Apply Transforms: This is a step many beginners miss. In Object Mode, select your model. Press Ctrl + A and apply All Transforms. This resets the object's location, rotation, and scale data, preventing bizarre warping issues during rigging and upload.
- Clean Up Geometry: Go into Edit Mode (Tab). Select all vertices (A), then go to
Mesh > Clean Up > Merge by Distance. This will remove any duplicate vertices that can cause shading and rigging problems. - UV Unwrapping: Your model needs a UV map to accept textures. Select your model, go to the UV Editing workspace, and perform a Smart UV Project for a quick and easy unwrap suitable for this exercise.
Pro Tip: Topology matters! While a simple bot can be made of basic shapes, organic creatures require careful edge flow. Lines of vertices should follow the natural "creases" where the model will bend (like elbows and knees) to ensure good deformation.
Phase 2: Rigging to the Standard Skeleton
This is where we give our static mesh a skeleton to allow for movement. We use the standard SL/OpenSim skeleton because Animesh objects are technically a form of avatar, just non-wearable.
- Import the Skeleton (Avastar Method): In Blender, with the Avastar plugin installed, go to
Add > Avastar > Basic. This will add a standard avatar rig to your scene. - Position Your Mesh: Move your helper bot model so it is roughly centered within the Avastar armature. The exact position isn't critical for a non-humanoid, but it's good practice.
- Delete Unnecessary Bones: The full Avastar rig has many bones we don't need for a simple bot. In Edit Mode for the armature, carefully select and delete bones that won't affect your model. For our bot, we might only keep the
COG,Torso, -Chest,Neck, andHeadbones. TheHeadbone could control the "eye" part of the bot. CRITICAL: Never delete the mainAvatar Centeror the root bone. - Parent the Mesh to the Armature: This is the moment of truth. In Object Mode, select your mesh object first, then Shift-select the armature. Press Ctrl + P to open the parent menu. Choose Armature Deform > With Automatic Weights. Blender will now attempt to automatically assign influence for each bone to the nearby vertices of your mesh.
Phase 3: The Art of Weight Painting
Automatic weights are a good start, but rarely perfect. Weight painting is the process of manually correcting which vertices are controlled by which bones.
- Enter Weight Paint Mode: Select your mesh object. In the mode dropdown menu (top-left), switch from Object Mode to Weight Paint Mode.
- Select Bones to Paint: With the mesh selected, Shift-select the armature and go to its Pose Mode. Now, you can select a bone in the armature, and the mesh will show a heat map. Red means 100% influence, blue means 0% influence.
- Paint the Influence: Use the tools in the tool shelf (T). The
Drawbrush adds weight, and theSubtractbrush removes it. For our bot, select theHeadbone. Make sure the "eye" part of your bot is solid red, and the body is mostly blue for this bone. Select theChestorTorsobone and ensure the body is red for it. - Test Deformations: In Pose Mode for the armature, select a bone and rotate it (R). Watch how the mesh deforms. If you see ugly stretching or vertices being left behind, you need to go back to Weight Paint mode and adjust the weights. Press Alt + R to clear rotation and test again.
Pro Tip: Use the "Auto Normalize" feature in the brush settings. It ensures that the weights for any given vertex across all bones always add up to 1.0, which prevents many common "exploding mesh" problems.
Phase 4: Creating a Simple Animation
Now, let's make our bot "breathe" with a simple idle animation.
- Open the Action Editor: Change one of your Blender windows to the
Dope Sheet, and then change its mode to Action Editor. - Create a New Action: With the armature selected in Pose Mode, click the "New" button in the Action Editor. Name your animation something descriptive, like
Bot_Idle. - Set Keyframes:
- Go to frame 1 in your timeline. Select all bones (A) in Pose Mode. Press I and insert a keyframe for Location, Rotation, & Scale.
- Go to a later frame, like frame 60. Select the main body bone (e.g.,
Torso) and move it up slightly on the Z-axis (G Z). - Select all bones again (A), press I, and insert another keyframe.
- Go to frame 120. Copy the keyframe from frame 1 (Shift + D) and place it here. This creates a perfect loop.
- Save the Action: Click the "shield" icon next to the action name. This gives it a "Fake User" and prevents Blender from deleting it if it's not currently assigned to an object.
Phase 5: Exporting for Alife Virtual
We need to export two things: the rigged mesh (a .dae file) and the animation (a .bvh or .anim file, though we'll upload from Blender directly with Avastar).
- Exporting the Mesh (
.dae):- Select your rigged mesh object and the armature.
- Go to
File > Export > Collada (Default) (.dae). - In the export options on the right, use the "SL/OpenSim Rigged" preset if available. If not, ensure these are checked:
Selection Only,Include Armatures. In the Geometry tab, checkApply Modifiers. - Name your file (e.g.,
helper_bot.dae) and export.
- Exporting the Animation: Avastar makes this easy. With your armature selected and the
Bot_Idleaction active, go to the Avastar Animation Export section. Set the start and end frames, enableLoop, and export the animation. Alternatively, you can upload animations directly from Blender to Alife Virtual using Avastar's uploader, which is often more reliable.
Phase 6: The FREE Upload to Alife Virtual
Time to see your creation come alive in our free metaverse. Remember, this costs you nothing!
- Upload the Mesh: In Firestorm Viewer, go to
Build > Upload > Mesh Model. Select yourhelper_bot.daefile.- In the preview window, give your object a name.
- Under the "Upload options" tab, CRITICALLY IMPORTANT: Check the box for
Include skin weight. This tells the uploader that your mesh is rigged. - You can also include Level of Detail (LOD) models and a physics shape here. For this first attempt, the defaults are fine.
- Click "Calculate weights & fee." Notice the fee is L$0! Click "Upload."
- Upload the Animation: Go to
Build > Upload > Animation. Select the animation file you exported. Give it a name, set it to loop, and adjust priority if needed. A low priority (like 1 or 2) is good for an idle animation. Again, notice the upload is FREE. - Rez Your Object: Drag the uploaded mesh object from your inventory to the ground on your FREE Private Island. It will appear as a static, non-moving object.
Phase 7: Breathing Life into Your Creation with LSL
The final step is a simple script to make the object play your animation.
- Prepare the Object: Right-click your rezzed bot and select "Edit." Go to the "Content" tab. Drag both the
Bot_Idleanimation and the script you are about to create into the object's inventory. - Create the LSL Script: In the Content tab, click
New Script. A new script will open. Delete the default content and paste this code:// Simple Animesh Animation Script - Alife Virtual School Class 51 string anim_name = "Bot_Idle"; // The EXACT name of your animation in inventory default { state_entry() { // When the object is rezzed or the script is reset, do this: // First, we need to request permission to run animations. llRequestPermissions(llGetOwner(), PERMISSION_TRIGGER_ANIMATION); } run_time_permissions(integer perm) { // This event fires after the user clicks "Yes" on the permission dialog. if (perm & PERMISSION_TRIGGER_ANIMATION) { llStartAnimation(anim_name); // Start the animation llSay(0, "Animation started! I'm alive!"); } } on_rez(integer start_param) { // When the object is rezzed from inventory, reset the script to re-request permissions. llResetScript(); } } - Save and Run: Save the script. It will automatically start. You will see a permission dialog pop up on your screen. Click "Yes." Your bot should immediately start playing its idle animation!
Congratulations! You have successfully created and deployed a fully functional Animesh object in Alife Virtual. You now hold the power to populate our open simulator world with living, breathing content.
Advanced Applications
- Interactive NPCs: Expand the LSL script to include `llSensor` to detect avatars. When someone approaches, the bot could play a "greeting" animation and send a message.
- Complex Pets: Create multiple animations (walk, run, sit, sleep) and a state machine in LSL to switch between them. Add pathfinding to make it follow you around your land.
- Animated Vehicles: Rig the moving parts of a vehicle, like landing gear, spinning turbines, or opening canopies. Trigger these animations with `sit` and `unsit` events.
- Environmental Storytelling: Use Animesh for flags waving in the wind, pistons pumping in a factory, or mystical crystals pulsing with energy, all without complex physics.
Your First Animesh Project
Assignment: Create a unique floating companion.
- Model a simple, non-humanoid companion. It could be a floating book with flapping pages, a mystical orb, or a small robotic drone.
- Rig it using at least three bones from the standard skeleton.
- Create two animations: a looping "idle" animation and a "reaction" animation (e.g., a little jump or a spin).
- Upload it to your free private island in Alife Virtual.
- Write an LSL script that plays the idle animation by default, but plays the "reaction" animation when you click on the object. (Hint: you'll need a `touch_start` event and use `llStopAnimation` and `llStartAnimation`).
Frequently Asked Questions (FAQ)
- Why does my mesh look "exploded" or distorted when I upload it?
- This is almost always a weight painting issue. It means some vertices either have no weight assigned to any bone, or they have incorrect weights. Go back to Blender, check your weights, and ensure "Auto Normalize" is on. Applying transforms (Ctrl+A) before rigging also prevents this.
- Why won't my animation play in-world?
- Check these things: 1) Did you grant permissions? The script needs `PERMISSION_TRIGGER_ANIMATION`. 2) Is the animation name in the script (`anim_name`) spelled exactly the same as the animation file in the object's inventory? 3) Is the animation file actually inside the object's contents? 4) Did you check "Include skin weight" when you uploaded the mesh?
- What is the difference between Animesh and a regular rigged avatar?
- A rigged avatar is something you wear and it replaces your own avatar's body. Animesh is an object you rez in-world. It uses the same skeleton and animation principles, but it exists as an independent object, like a piece of furniture or a pet, not as your personal avatar.
- My Animesh object has a very high Land Impact. How can I lower it?
- Land Impact for Animesh is heavily influenced by vertex count and the complexity of the physics shape. To reduce it: 1) Optimize your model in Blender to have fewer polygons. 2) Create custom, simpler Level of Detail (LOD) models for when you are far away from the object. 3) Create a very simple, low-poly physics shape (like a cube or a few convex hulls) and upload it in the "Physics" tab of the uploader.
Your Creative Journey Starts Now
You have seen the power, the process, and the potential. You've also seen that in Alife Virtual, the financial barriers that hold creators back simply do not exist. There is nothing stopping you from building the world of your dreams.
Your FREE 65,536 sqm private island is waiting. Your FREE unlimited uploads are ready. A supportive community and your FREE pro mesh avatar are here to welcome you home.
Download Firestorm, log into Alife Virtual, and start creating today. The metaverse is not just something you visit; it's something you build. We can't wait to see what you create.
🎓 Ready to Practice In-World?
Get your FREE island and practice everything you just learned — no credit card, no monthly fees.
Claim Your Free Island Now →No credit card required · Takes 2 minutes · Your island is FREE for one month