Multi-Scene Management for RP Sims
Multi-Scene Management for RP Sims — Free class in Alife Virtual School
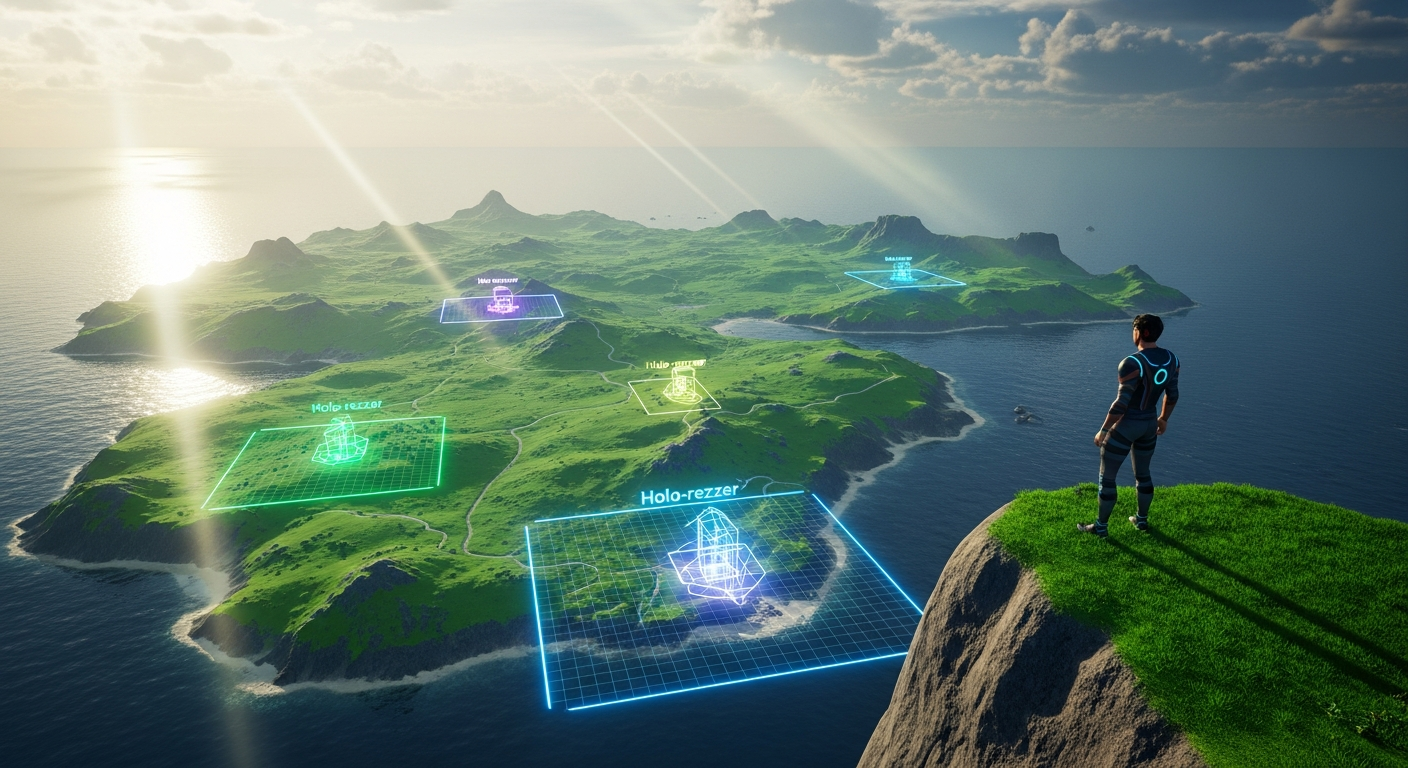
Have you ever dreamed of running a roleplay sim that transforms at the click of a button? Imagine your bustling cyberpunk metropolis melting away to reveal a post-apocalyptic wasteland for the next chapter of your story, or a medieval castle courtyard instantly becoming a futuristic starship bridge. This level of dynamic storytelling is often considered the holy grail for sim owners, but it feels impossibly complex or expensive. It’s not. Welcome to Alife Virtual School’s Class 66: Multi-Scene Management for RP Sims. In this advanced workshop, we will demystify the art of using holo-rezzer systems to manage multiple, large-scale environments on a single region. This powerful technique will unlock unprecedented creative freedom, allowing you to tell bigger, better, and more diverse stories within the incredible, free 3D world of Alife Virtual, a leading Second Life alternative and Open Simulator-based metaverse.
The Alife Advantage: Why Here is Better (and Free)
Before we dive into the technical details, it's crucial to understand why learning this skill in Alife Virtual is a game-changer compared to other platforms. In legacy virtual worlds, the primary barrier to this kind of large-scale creation is cost. Running a single, full-prim region can cost hundreds of dollars per month, and the object limits often force creators to compromise their vision. Storing multiple high-prim scenes becomes a financial and logistical nightmare. Alife Virtual eliminates these barriers entirely, creating the perfect sandbox for ambitious creators.
Let's break down the cost-benefit analysis:
| Feature | Alife Virtual | Competitors (e.g., Second Life) |
|---|---|---|
| Private Island (65,536 sqm) | 100% FREE, for one month. Every member gets one. | $300+ per month tier fees, plus setup costs. |
| Object Capacity (Prims/Land Impact) | Generous limits designed for large-scale builds. Your free island supports vast, complex scenes. | Strict limits tied to expensive land tiers. More prims = more money. |
| Mesh & Texture Uploads | UNLIMITED and FREE. Upload all the assets you need for your scenes without penalty. | Fee-based (e.g., L$10 per upload), creating a "tax" on creativity that quickly adds up for large projects. |
| Scripting & Tool Deployment | Full LSL scripting support. Deploy complex systems like holo-rezzers without performance throttling tied to land tiers. |
Script performance can be limited by parcel or land settings, often encouraging upgrades. |
The conclusion is simple: In Alife Virtual, your only limit is your imagination, not your wallet. The robust, free infrastructure empowers you to build, experiment, and deploy advanced systems like multi-scene rezzers without financial risk. This is the cornerstone of our truly free virtual economy and creative ecosystem.
What You Will Learn
Upon completing this class, you will be able to:
- Understand the core theory behind holo-rezzer (or scene-rezzer) systems.
- Properly prepare and package a complex build (a "scene") into a single, manageable
linkset. - Use a standard holo-rezzer system to record the position, rotation, size, and other parameters of your scene into a
notecard. - Configure a control panel or HUD to manage and swap between multiple saved scenes.
- Implement performance optimization techniques to ensure smooth scene transitions for your players.
- Troubleshoot common issues like object drift, script errors, and linking problems.
Prerequisites
This is an Advanced class. To succeed, you should already be comfortable with the following concepts in Alife Virtual (or a similar Open Simulator environment):
- Advanced Building: You must be proficient at creating and manipulating prims, including linking and unlinking large groups of objects.
- Inventory Management: You should know how to create and edit
notecards and manage object contents. - Viewer Proficiency: Full command of the camera controls (especially with Alt and Shift modifiers) is essential for precise object placement. We recommend using the Firestorm viewer for full compatibility.
- Basic Scripting Concepts: While you won't need to write
LSL scriptingfrom scratch, understanding what scripts do, how they are stored in prims, and the concept of script memory will be highly beneficial.
The Deep Dive: Building Your Multi-Scene Sim
Let's get our hands dirty. The process can be broken down into a logical workflow: Prepare, Record, Configure, and Deploy.
Part 1: The Theory - What is a Holo-Rezzer?
A "holo-rezzer" (a term inherited from early virtual world tech) is fundamentally a scripted system that performs two main functions:
- Record: It scans a
linksetof objects and records the properties of each individual prim (position, rotation, size, color, texture, etc.) into a text format, which is then saved in anotecardinside the system's inventory. - Rez: It reads the data from that
notecardand uses theLSL scriptingfunctionllRezObject()to create a copy of each object from its inventory and applies the saved properties using functions likellSetLinkPrimitiveParamsFast()to place it exactly where it was during the recording.
Think of it as a sophisticated "Save State" for a physical build. The build itself is stored as a "master copy" inside the rezzer system, and the notecard acts as the blueprint for how to assemble it in-world.
Part 2: Preparing Your Scene for Recording
This is the most critical and detail-oriented phase. Garbage in, garbage out. A poorly prepared scene will lead to a buggy, frustrating experience.
- Establish a Build Area: On your free Alife Virtual island, find a clear, flat area. This will be your "staging ground." Many pro builders create a "build sphere" or "skybox" high above their sim to work without distraction.
- Create the Root Prim: Rez a single, standard cube
prim. This will be the Root Prim of your entire scene. All other objects will be linked to it.- Positioning: Place this root prim at the absolute center of your intended scene, often at coordinates like <128, 128, Z>. Set its position to be a round number to make adjustments easier.
- Naming: Name it something clear, like
SCENE_A_ROOT. - Make it Transparent: In the texture tab of your build menu, set its transparency to 100%. It needs to exist, but it doesn't need to be seen.
- Build Your Scene: Now, build your entire roleplay scene around this invisible root prim. Construct your buildings, lay out your props, and decorate the environment.
- Do NOT move the root prim. Move everything else relative to it.
- Optimize as you go. Use low-poly mesh where possible. Consolidate textures onto a single texture atlas to reduce server load. Remember, even with Alife's generous limits, performance is key for a good user experience.
- The Great Linking: Once your scene is complete, it's time to link everything together.
- Select all the prims of your scene *first*. You can do this by holding Shift and dragging a selection box around your entire build.
- With all scene objects highlighted, hold Shift and click on your invisible Root Prim last. The root prim must be the very last object selected. It will be highlighted in yellow.
- Press Ctrl + L or go to the Build menu and select "Link."
- Your entire scene should now be a single object (a
linkset). If you try to move it, everything should move together. Name this newlinksetsomething descriptive, like[SCENE] Cyberpunk Alley.
Pro Tip: Before linking, give your objects descriptive names (e.g., `wall_north`, `desk_main`, `light_flicker`). This makes debugging much easier later. A rezzer system that supports object naming in its notecard format is invaluable for complex scenes.
Part 3: Recording the Scene with a Rezzer System
There are many free and open-source holo-rezzer systems available on the Alife grid and other Open Simulator communities. For this tutorial, we'll assume you have a standard "Rez-Faux" or similar notecard-based system.
- Rez Your Holo-Rezzer: Place the rezzer system's main control unit on the ground.
- Store the Master Copy: Take the entire linked scene from your inventory (the `[SCENE] Cyberpunk Alley` object) and drag it into the rezzer unit's contents. This is vital. The rezzer needs the original object to know what to rez.
- Initiate the Scan: The method varies by system. Usually, you will rez the scene manually one last time from the rezzer's contents. Place it exactly where you want it to appear for your players. Then, you'll click the rezzer's control unit and select an option like "Scan," "Record," or "Learn" from its menu. You may need to type a name for the scene, like "CyberAlley".
- Verify the Notecard: The system will now do its work. This can take a few minutes for a large scene. When it's done, it will notify you. A new
notecard, likely named "CyberAlley," will appear in the rezzer's contents. You can open it to see the raw data—a long list of vectors and rotations. You don't need to understand it, but it's good to confirm it was created. - Clean Up: Once the notecard is saved, you can de-rez (delete) the scene you placed in-world. The rezzer now has everything it needs to recreate it from scratch.
Common Mistake: Forgetting to place the master copy of the build into the rezzer's inventory. If the object isn't in the rezzer's contents, the script will have nothing to rez and will throw an error. The rezzer doesn't magically create objects; it creates *copies* of objects it already holds.
Part 4: Configuring the Control Panel
Your rezzer system likely came with a control panel or a HUD. This is the user interface for you and your admins.
- Edit the Configuration: The control panel is usually configured via a
notecardin its own contents, often named.configorbuttons. - Add Your New Scene: Open this notecard. The format is typically straightforward, like
Button Name | Notecard Name. Add a new line for your scene:
Cyberpunk Alley | CyberAlley - Save and Reset: Save the notecard. The control panel may reset itself, or you may need to reset its scripts manually to get it to read the new configuration.
- Test!: Your control panel should now have a new button labeled "Cyberpunk Alley." Click it. If everything was done correctly, your entire scene will rez into place, perfectly aligned. The system will also have a "Derez" or "Clear" button to remove the scene.
Congratulations! You have successfully packaged and configured your first scene. Now, simply repeat the process (Prepare, Record, Configure) for your other scenes (e.g., Post-Apocalyptic Waste, Medieval Courtyard). You can add dozens of scenes to the same controller, all managed by a single system.
Advanced Applications
- Phased Events: Create multiple versions of the same scene to show progression. Scene 1: "City Normal." Scene 2: "City Under Attack" (with rubble and fire). Scene 3: "City Rebuilding" (with cranes and scaffolding). Swap them out to advance your roleplay's plot.
- Environmental Systems: Don't just swap whole buildings. Create smaller "prop" scenes. One scene could be a set of props for a sunny day (picnic blankets, umbrellas). Another could be for a rainy day (puddles, wet-asphalt overlays, steaming vents). Rez these on top of your base scene to change the mood.
- Player Housing Customization: On a larger scale, you can use this same tech to offer customizable player homes. Each player could have a control panel that rezzes their chosen furniture layout inside their empty house shell.
Practice Exercise
To solidify your skills, complete the following task on your Alife Virtual island:
- Create a small 10m x 10m platform.
- On this platform, build two distinct "micro-scenes" side-by-side.
- Scene 1: A tiny, cozy library corner. Include a bookshelf, a chair, a rug, and a lamp.
- Scene 2: A tiny, sci-fi medbay. Include a medical scanner, a bio-bed, and some futuristic computer consoles.
- Individually package each scene into its own linkset with its own invisible root prim.
- Use a holo-rezzer system to record "Library" and "Medbay" into two separate notecards.
- Configure a control panel to have two buttons that let you rez and derez each scene in the center of your platform.
- Your goal is to be able to swap between the library and the medbay with a single click.
Frequently Asked Questions (FAQ)
- 1. What is the maximum number of prims or objects a scene can have?
- This is determined by script memory and region performance, not a hard-coded limit.
LSL scriptinghas memory limits, so a single notecard can only get so big. For extremely large scenes (over 1,500-2,000 prims), it's best practice to split them into multiple, smaller rezzers (e.g., "City Block A" and "City Block B") that can be rezzed together. Alife's high-performance regions handle this far better than older grids. - 2. Can my rezzed objects contain scripts?
- Yes, but with a major caveat. When a scene is de-rezzed, any changes to the scripts' states are lost. For example, if a scripted door is set to "locked," it will revert to its default "unlocked" state the next time the scene is rezzed. For persistent scripted objects, they should be part of the base sim and not part of the rezzed scene.
- 3. My scene is rezzing in the wrong place or with objects scattered! What did I do wrong?
- This is almost always a root prim problem. Either you forgot to link everything to the root prim, you linked the items in the wrong order (remember, the root prim must be last), or you moved the root prim after building around it. Go back to the "Preparing Your Scene" phase and meticulously re-link your master copy.
- 4. Why not just build everything and set the prims to be phantom or transparent?
- This is a common but inefficient method. Even if prims are transparent, they still exist on the server and contribute to Land Impact and server load, especially if they have scripts. This can lead to significant lag. A proper holo-rezzer system completely removes the objects from the region, meaning they have zero impact on performance until they are rezzed. It is a far more elegant and scalable solution for this corner of the metaverse.
Your Story Awaits. Build It in Alife Virtual.
You now possess the knowledge to become a master world-builder, capable of creating dynamic, evolving environments that will captivate your players. The best part? You can do it all without ever paying for land, uploads, or creative tools. This is the promise of Alife Virtual.
Stop letting financial barriers and technical limitations hold back your stories. Claim your free 65,536 sqm private island, download the Firestorm viewer, and start building the sim of your dreams today. Your community is waiting.
Join Alife Virtual Now and Unleash Your Creativity!
🎓 Ready to Practice In-World?
Get your FREE island and practice everything you just learned — no credit card, no monthly fees.
Claim Your Free Island Now →No credit card required · Takes 2 minutes · Your island is FREE for one month