CLASS 36: Terraforming Your Island
Terraforming Your Island — Free class in Alife Virtual School
Welcome, creators, to Alife Virtual School. Have you ever dreamed of sculpting a world from scratch? Of raising mountains with a click, carving out serene lakes, and painting landscapes with the textures of your imagination? In this comprehensive guide, we will master the art of Terraforming Your Island. This foundational skill is your first major step toward transforming the blank canvas of your free Alife Virtual island into a breathtaking, personalized environment. In this burgeoning metaverse, land is not just a place to build; it's a statement, an experience, and the very ground upon which your virtual life will unfold. Unlike other platforms, Alife Virtual empowers you to shape your world without financial barriers, making it a true creator's paradise and a leading Second Life alternative.
The Alife Advantage: Your World, Your Rules, Zero Cost
In many virtual worlds, the dream of owning and shaping a private region is locked behind a steep paywall. The creative freedom to terraform is a premium feature, often costing hundreds of dollars per month. Alife Virtual demolishes this barrier. We believe that creativity should be accessible to all, forming the core of our 100% free economy. Let's break down the staggering difference in cost and value:
| Feature | Alife Virtual | Second Life |
|---|---|---|
| Private Island (Full 65,536 sqm Region) | FREE, for one month | ~$229-349 USD initial setup + ~$229-349 USD per month |
| Full Terraforming & Estate Rights | Included & FREE | Included with monthly tier fee |
| Uploading Custom Terrain Textures | FREE & Unlimited | L$10 (~$0.04 USD) per texture upload |
| Uploading RAW Terrain Files | FREE | Included with monthly tier fee |
This isn't just a cost saving; it's a fundamental shift in creative power. On Alife Virtual, you can experiment, make mistakes, and perfect your landscape without worrying about a looming bill. This is the freedom that defines our free 3D world.
What You Will Learn
Upon completing this masterclass, you will be able to:
- Access and navigate the powerful in-viewer Land Tool.
- Master the five core terraforming functions:
Raise,Lower,Smooth,Flatten, andRevert. - Understand and effectively use the tool's settings for
Size,Strength, andFalloffto achieve precise results. - Sculpt natural-looking features like mountains, valleys, hills, and plateaus.
- Apply custom terrain textures to "paint" your landscape with different ground covers.
- Import pre-made
.rawterrain files to instantly create complex and unique island shapes.
Prerequisites
- An active Alife Virtual account (Get yours free here).
- The Firestorm Viewer installed (Our recommended viewer, fully compatible with Alife).
- Ownership of your free 65,536 sqm private island, which is automatically granted to every new resident.
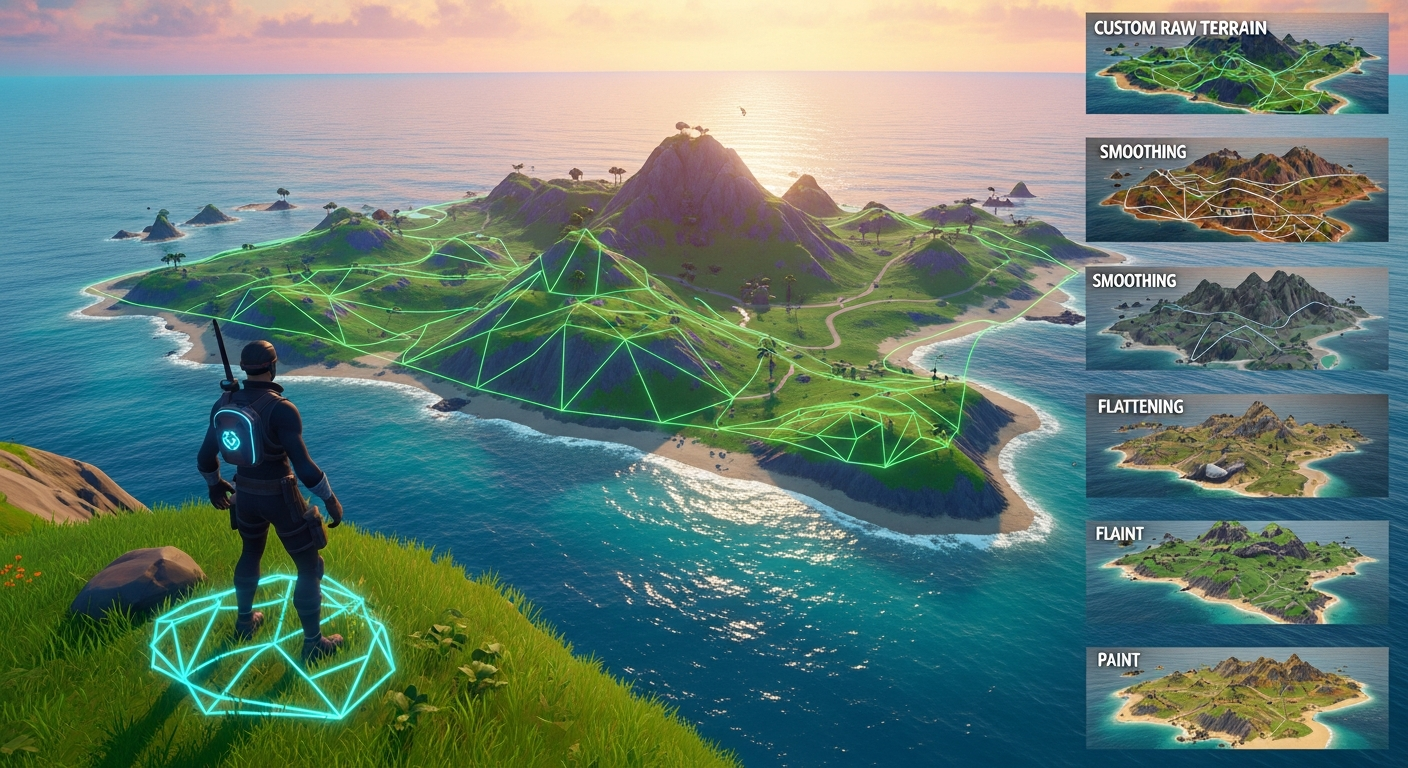
Step-by-Step Tutorial: Sculpting Your Virtual Paradise
Your island initially starts as a flat expanse of land at sea level. It's a blank canvas. Let's grab our tools and begin sculpting. For this tutorial, we recommend flying to a high altitude above your island to get a bird's-eye view.
Part 1: Accessing the Land Tool
The Land Tool is your primary interface for all terraforming. You can access it in two ways:
- Menu Bar: Navigate to
World>Region/Estate. In the new window, click theTerraintab. - Keyboard Shortcut: Press Ctrl + Shift + T to open the Land Tool directly.
Once opened, you will see a small "Edit Terrain" window pop up on your screen. This is your command center.
Part 2: Understanding the Land Tool Interface
The tool is simple but incredibly powerful. It consists of a set of radio buttons for the tool type and three sliders that control the tool's behavior.

(Image depicting the Firestorm Land Tool window with buttons and sliders labeled)
- Tool Selection (Radio Buttons):
Select Land: Used to select parcels of land for sale or modification of land settings. We will not be using this for direct terraforming.Flatten: Pushes or pulls the terrain towards a flat plane.Raise: Pushes the terrain upwards, creating hills and mountains.Lower: Pushes the terrain downwards, creating valleys and seabeds.Smooth: Averages the height of the terrain under the brush, softening jagged edges and creating natural slopes.Revert: Resets the terrain under the brush to its last "baked" state (more on this later).
- Control Sliders:
- Size: Controls the diameter of your circular brush, shown as a red circle on the terrain. A larger size affects a wider area.
- Strength: Determines how intensely the tool affects the terrain per second. High strength causes rapid changes, while low strength allows for subtle, gradual adjustments.
- Falloff: Controls the softness of the brush's edge. A high falloff (e.g., 1.0) creates a very sharp, distinct edge. A low falloff (e.g., 0.1) creates a very soft, feathered edge, which is excellent for blending.
Part 3: The Art of Practical Terraforming
Now, let's put these tools into practice. Select a tool, adjust your sliders, and then left-click and hold your mouse button on the terrain to apply the effect.
H3: Create Majestic Mountains with Raise
To create a mountain range, select the Raise tool.
- Set your brush
Sizeto a large value (e.g., 32m). - Set your
Strengthto a low-to-medium value (e.g., 0.1-0.2). This prevents creating ugly, sharp spikes. - Set your
Falloffto a low value (e.g., 0.2) for a soft, natural base. - Click and hold over an area of your island. You will see the land begin to rise. Move the mouse around to build up a large landmass.
- Now, decrease the brush
Sizeand slightly increase theStrength. Add smaller peaks on top of the base you just created. Vary your brush size and strength to create a more organic, less uniform mountain.
Pro Tip: The Layering Technique
Never use 100% strength to build a mountain in one go. It will look artificial and spiky. The key to realistic terrain is layering. Use a large, weak brush to build the general shape, then use progressively smaller, slightly stronger brushes to add detail, peaks, and ridges.
H3: Carve Serene Valleys and Lakes with Lower
The Lower tool is the inverse of Raise. It's perfect for creating lakes, rivers, or canyons.
- Select the
Lowertool. - To create a lake, use a medium-sized brush with low
Strengthand lowFalloff. - Click and hold in the center of your desired lake area. The land will sink. Moving the brush around will expand the depression.
- Continue lowering until the land is below the region's water level (by default, 20 meters). You will see water fill the area you've created.
H3: Achieve Natural Beauty with Smooth
The Smooth tool is arguably the most important for creating professional-looking landscapes. It's the "blending" tool that turns jagged digital shapes into believable natural slopes.
- After using
RaiseorLower, your terrain might have sharp edges or steps. - Select the
Smoothtool. - Use a large brush with medium
Strength. - Gently "paint" over the jagged areas. You'll see the sharp transitions soften into gentle, rolling hills and slopes. Go over the base of your mountains and the shores of your lakes to make them look natural.
Common Mistake: Neglecting to Smooth
A beginner's landscape is easy to spot: it's full of sharp, un-smoothed edges. Always spend time smoothing your work. A few minutes with theSmoothtool can elevate your island from looking "blocky" to looking organic and beautiful.
H3: Build Perfect Foundations with Flatten
The Flatten tool is essential for creating perfectly level ground, ideal for building foundations, roads, or plateaus.
- Select the
Flattentool. - Find a piece of terrain that is at the exact height you want your flat area to be.
- Right-click on that spot. This "samples" the height.
- Now, left-click and drag over the area you want to flatten. All terrain under your brush will be raised or lowered to match the sampled height.
- This is perfect for creating a flat building plot on the side of a hill you've just raised.
Part 4: Painting Your Landscape with Textures
Once the shape of your land is complete, it's time to paint it. Your island has four terrain textures that blend based on height.
- Go to the menu
World>Region/Estateand click theTerraintab. - You will see four texture swatches labeled 1 through 4, corresponding to different height ranges.
- Texture 1 (Low): Typically sand or dirt, appears at the lowest elevations.
- Texture 2 (Mid-Low): Typically dark grass.
- Texture 3 (Mid-High): Typically light grass or rock.
- Texture 4 (High): Typically rock or snow, appears at the highest elevations.
- To change a texture: Click on a swatch. The "Pick: Texture" window will open. You can select a new texture from your inventory. Because Alife Virtual offers free unlimited uploads, you can find any seamless terrain texture online (grass, sand, rock, snow, etc.), upload it for free, and apply it here.
- To change blend ranges: Below the textures, you'll see sliders for "Terrain Low" and "Terrain High." These control the height (in meters) at which the textures start to blend into one another. Adjust these to control how high up your beach sand goes, or where the snow line on your mountain begins.
Part 5: Advanced Creation with RAW Terrain Files
For truly unique and complex landscapes, you can bypass manual sculpting and import a terrain heightmap. This is done using a special file format called .raw.
A .raw file is a grayscale image where white represents the highest point and black represents the lowest point. You can create these in programs like Photoshop or GIMP, or download them from dedicated terrain-generating software (like World Machine, L3DT) or online resources.
- Prepare your file: For a standard Open Simulator region like your Alife island, the
.rawfile must be 256x256 pixels in size, 8-bit grayscale, and saved with the.rawextension. - Navigate to the uploader: Go to
World>Region/Estate>Terraintab. - Upload the file: Click the
Upload RAW terrain...button. Select your prepared.rawfile from your computer. - Confirm: The viewer will ask for confirmation. Once you approve, your entire island's terrain will be instantly reshaped to match the heightmap from your file. You can create anything from a perfect volcano caldera to a sprawling canyon system with a single click.
Pro Tip: Saving Your Work withBake Terrain
After you've created a landscape you love, go to theTerraintab in theRegion/Estatewindow and clickBake Terrain. This saves the current shape of your land as the new "default" state. Now, if you make a mistake while terraforming, theReverttool will return the land to this baked state, not the original flat square. You can also use theDownload RAW terrain...button to save your sculpted masterpiece to your computer as a.rawfile for backup!
Advanced Applications
Mastering terraforming opens doors to more advanced creative projects:
- Environmental Storytelling: Create a meteor crater, ancient ruins half-buried in the sand, or a mysterious canyon system to guide visitors through a story.
- Water Worlds: Lower the majority of your island below the water level and then use the
Raisetool to create an archipelago of small, connected islands. - Synergy with LSL Scripting: While beyond this beginner's guide, know that terraforming can be combined with LSL scripting. Advanced creators can make objects that dynamically alter the terrain around them, creating interactive environments.
- Mesh and Terrain Integration: Combine your sculpted terrain with custom mesh landscape pieces (like detailed rock formations or caves) for the ultimate in realism. With free mesh uploads in Alife, the possibilities are limitless.
Practice Exercise: The Cove Sanctuary
Now it's your turn to apply what you've learned. Complete the following task on your free island:
- Use the
RaiseandSmoothtools to create a C-shaped mountain range around one edge of your island, forming a sheltered cove. - Use the
Lowertool to ensure the water in the cove is deep enough for swimming. - Use the
Flattentool to create a perfectly level area inside the "C" of the mountains for a future home. - Go to the
Terraintab and change the lowest texture (Texture 1) to a sand texture of your choice (find one online and upload it for free!). Adjust the blend height so the sand forms a beautiful beach around your cove. - When you are happy with the result, Bake your new terrain to save it.
Frequently Asked Questions (FAQ)
- 1. I made a huge mistake! How can I reset my island's terrain?
- If you haven't "baked" the terrain yet, you can go to
World > Region/Estate > Terrainand click theRevert Terrainbutton. This will restore the island to its last baked state (or the original flat square if you've never baked it). - 2. Why can't I edit the terrain? My clicks do nothing.
- First, ensure you have the Land Tool open (Ctrl+Shift+T). Second, verify that you are on your own private island where you have estate owner rights. You cannot terraform land you do not own.
- 3. Where can I find free
.rawterrain files to use? - A great starting point is searching online for "256x256 8-bit raw terrain file" or "heightmap for OpenSim". There are many communities and websites dedicated to sharing these resources for virtual world creators.
- 4. What is the maximum height I can raise the land?
- In most Open Simulator grids like Alife Virtual, the terrain can be raised to a height of several hundred meters, but it's generally best to keep primary features below 200m for aesthetic and performance reasons. The absolute limit can vary, but there is more than enough room to build towering mountains.
- 5. Does terraforming use up my island's prims (Land Impact)?
- No. The terrain is completely separate from the object Land Impact budget of your region. You can sculpt as much as you want without affecting your ability to build and place objects. This is another fantastic advantage of our platform.
Your Canvas Awaits. Start Building Your World Today.
You now possess the knowledge to transform a flat, empty space into a world of your own design. This is the true power of a creator-focused metaverse. While others charge a fortune for this privilege, Alife Virtual provides it to you for free, for one month.
Claim your free 65,536 sqm island, log in with the popular Firestorm Viewer, and start sculpting. There are no fees, no tiers, and no limits on your creativity. This is your world.
Join Alife Virtual today and begin your journey as a world-builder!
🎓 Ready to Practice In-World?
Get your FREE island and practice everything you just learned — no credit card, no monthly fees.
Claim Your Free Island Now →No credit card required · Takes 2 minutes · Your island is FREE for one month